


PROXMOX
This includes notes, scripts, and a YouTube video published by Dekode regarding their Proxmox system.
- Proxmox Information
- Proxmox Recommended Setup
- Proxmox System
- Proxmox Installation
- After Proxmox Installation
- Proxmox Backup
- Proxmox Remote Connection
- Proxmox Close Screen
Turkish and English Youtube Videos.
Proxmox Information
- A Debian- based Linux distribution.
- The web interface is very easy to set up and manage.
- Using Qemu virtualization infrastructure images.
- VirtualBox – from VMware images You can export it .
- You can use it corporately; you can also pay for and receive the service.
- You need to use Ethernet, not Wi-Fi. I tried Wi-Fi, but it causes problems with NAT and other things, and it's not supported.
- If there are multiple Ethernet ports, it is recommended to separate these connections for different purposes such as Proxmox Management, ERP, Domain Server, and Mail Server.
Proxmox Recommended Setup
The HP 24 All-in-One PC we use for our lab can be replicated at home with a powerful laptop or gaming PC.
- İ7 işlemci
- 16 Gb RAM
- 1 M2 SSD disk
- 1 SATA disk
- 1 DVD drive used for Sata Disk
- Ethernet
Proxmox Installation
- You download the image from the internet, write it to disk using Balen Ether, and for Rufus, you need to write it in dd mode.
- Boot from USB and perform the installation.
- Boot from USB and perform the installation.
- You don't need to configure the areas during the initial setup.
- After installiton a web address is give,you can enter and configure.
After Proxmox Installation
Setting up the repository for updates.
Proxmox-> Updates-> Repositories alanına gidiyoruz
Here we select the 2 Repository areas that are labeled Enterprise and disable them.
Sonra buraya Add-> No-Subscription olanı ekliyoruz.
Daha sonra Update için Proxmox->Updates->Upgrades tuşuna basıyoruz.
Remove the warning that appears upon entry/Nap Close
1. Proxmox Shell will be opened.
2.cd /usr/share/javascript/proxmox-widget-tool
3.cp proxmoxlib.js proxmoxlib.js.backup
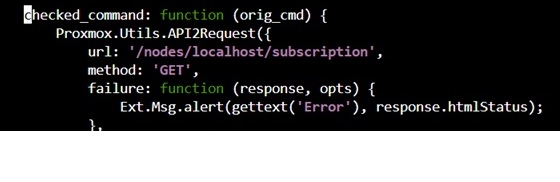
4.nano proxmoxlib.js
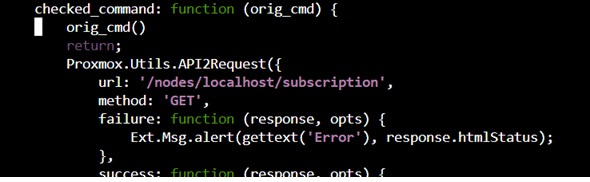
5.CRTL+F (checked_command)
6.4 Leave a space and add 2 lines;
orig_cmd()
return;
This way it will bypass the code,
no warning will be sent
Proxmox BACKUP
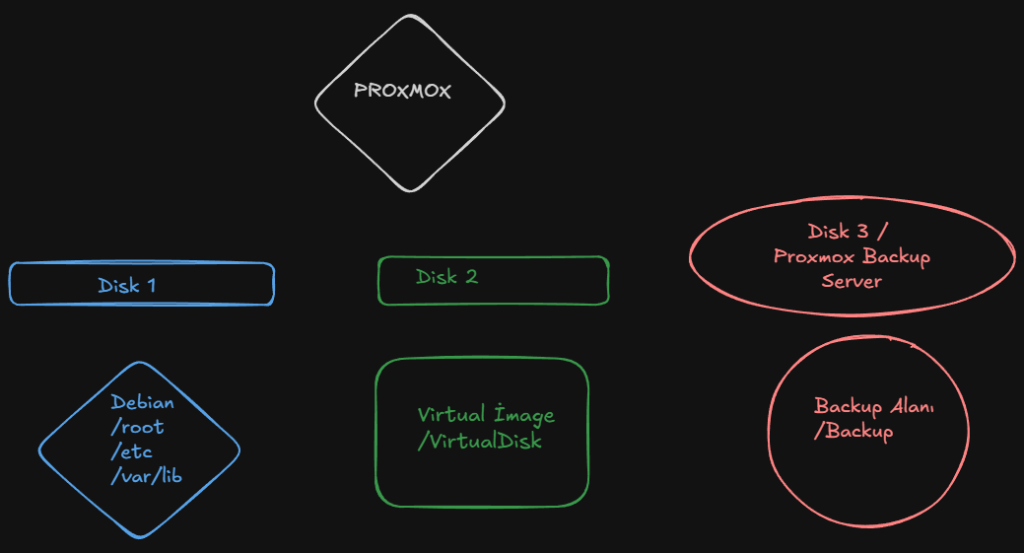
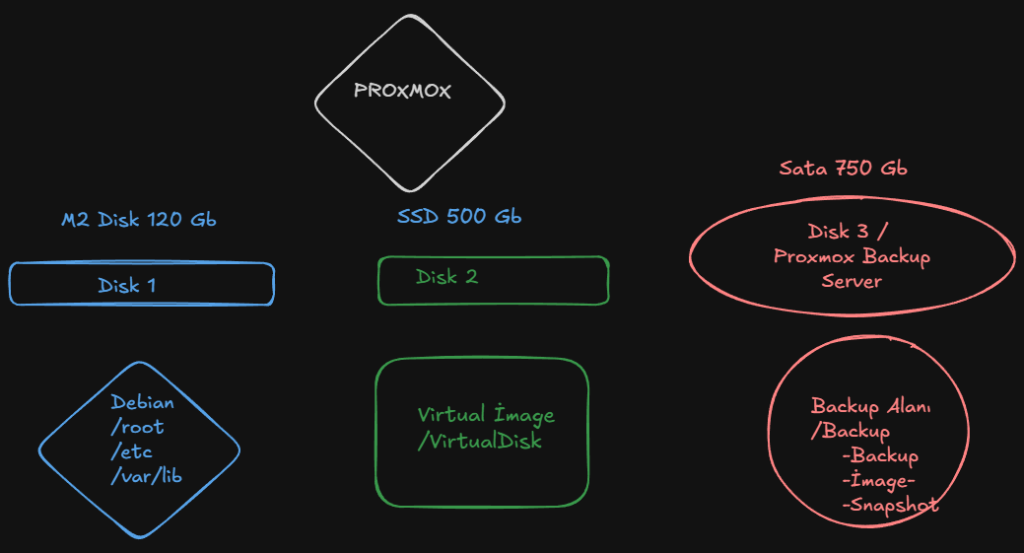
Proxmox primarily uses data from 3 different areas. 6 place to backup
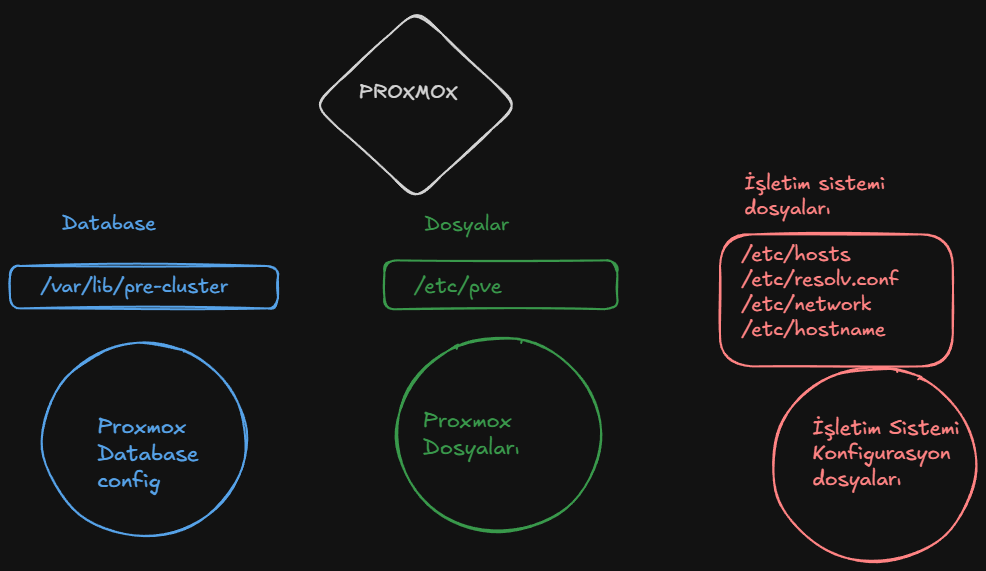
We create the following script named pve-backup.sh under /usr/local/bin/.
———————————————————————————-
#PVE-BACKUP SCRIPT
#!/bin/bash
DEST=”/mnt/pve/Backup/proxmox-config”
DATE=$(date +%F)
mkdir -p $DEST
tar czf $DEST/pve-config-$DATE.tar.gz /etc/pve /etc/network /etc/hosts /var/lib/pve-cluster /etc/resolv.conf /etc/network /etc/hostname
find $DEST -type f -mtime +30 -delete
———————————————————————————–
Make it executable:
chmod +x /usr/local/bin/pve-backup.sh
Then add to cron:
crontab -e
0 3 * * * /usr/local/bin/pve-backup.sh
This automatically creates daily configuration backups and deletes older files after 30 days.
Proxmox RECOVER
- 1.Proxmox is installed on a new disk or the same disk from the classroom , ensuring that the backup and virtual image files remain intact.
- 2.blkid komutu ile UUID numaraları not edilir.
- 3.The disks will be mounted .
- mkdir /mnt/pve/VMdisk
- mkdir /mnt/pve/Backup
- 4.Nano /etc/fstab
- UUID=6f528892-*** /mnt/pve/VMdisk ext4 defaults 0 2
- UUID=924e57e3-*** /mnt/pve/Backup ext4 defaults 0 2
- systemctl daemon-reload
- 5.the disks are mounted , the previously created backup is accessed and restored using tar.
- tar xzf /mnt/pve/Backup/pve-config-2026-06-15.tar.gz -C /
- 6.systemctl restart pve-cluster
Proxmox Remote Connection
I used Tailscale for the remote connection.
- You are creating an account on Tailscale.
- Install Tailscale agent to the computer you are using.
- In a Linux environment, you install a package and pair the Proxmox device with your account.
- ´curl – fsSL https://tailscale.com/install.sh | sh
- ´sudo tailscale up
And also for the certificate;
Proxmox Close Screen
I am not using Proxmox Host Scrren for management because of that Inwant to close Scrren after one minute. For this;
- nano /etc/default/grub
- GRUB_CMDLINE_LINUX_DEFAULT field We're going.
- GRUB_CMDLINE_LINUX_DEFAULT="quiet consoleblank = 60 " We're setting it . 60 seconds later Screen is closing.
- Then we are running update-grub for this to be valid.
Leave a Reply
You must be logged in to post a comment.